Showing posts with label Home Decor. Show all posts

Profiles

3/5/13


Hello world!
I have been busy since the beginning of the year, but I have been doing some crafts!
My family and I moved (again) to the Chicago area for my husband's job.
It has been a big adventure, and I am trying to get used to this cold weather and snow.
 
One of the crafts I have finished are these profiles of my children.
I love them.
Seriously, love them.
I have done a tutorial (shocking I know) on my blog Life Framed by Me.
Check it out HERE.
Happy creating, and I hope to be back soon!

Give Thanks

11/17/12


I am sure you have all been feeling thankful! I know I have been, and the holiday season is in full swing around here. I made this banner last year and was super excited to hang it up. I saw the idea at a friend's home in Texas, and kind of gave my own spin to it (she used leaves instead of squares to back her letters, I like the geometric look instead). I am not one for turorials (sorry). I don't like to follow them, and I certainly don't like to write them! So, here is a basic idea of what I did....
 
First of all, it is all made out of felt. I bought some brown felt off of the bolt since the 8x10 sheets would be too small. Then I bought a few different fall colors in the 8x10 sheets for the backing and letters. Then I just measured how big I wanted it to be, cut them to size, and then sewed the top of the brown felt so I could run a string through it. I cut everything else how I wanted and used my sewing machine to sew them on in contrasting colors. Feel free to do what you want in attaching them, it really just depends on the texture and style you want. I hot glued the circles and letters on to make it easier. As for the letters, I just blew up a font on my computer and used them as a template in cutting them out. It really was simple, just use your imagination! It could say anything you want as well, "thankful" "harvest" etc. I hope to make a Happy Birthday one soon for my children's birthdays in the spring/summer. I hope you like this idea! Anything is great with felt, I just love the stuff!
 
Happy Thanksgiving!

Canvas Happiness

10/6/12


If you would like to know how a $5 yard sale find turned into this canvas that makes me smile (a lot), check out my post on Life Framed by Me!
 
Oh the joys of yard sales!

Girl's Camp "Flashlight" Devotionals {Switch}

10/1/12

 
#3 - The Switch
The third component is the switch which represents the Holy Ghost.  You may have studied and prayed, you may have your testimony and are serving others, but your light won't truly shine without the Holy Ghost to inspire you in your endeavors.

For this handout, I made these.

The thing that I needed to do first was to call each mother and ask what type of light switch cover they had, single, double, etc (some light switches are shaped differently so be sure to double check).  I bought them at Home Depot and they are super cheap.

Then I purchased some wrapping paper from Hobby Lobby.  Because I was making so many, it was cheaper than buying a bunch of scrapbook paper.  FYI - wrapping paper is VERY thin.  You have to be careful not to tear the paper and beware that it can bubble more easily when applying the Mod Podge.

(I'm sorry that I don't have the completed one for you to look at.  I only made enough for each of the girls and forgot to get pictures beforehand.)

My New Discovery

9/8/12

Hello everybody! I (kind of) feel like I am recovered from summer and back into the blogging world!I hope that summer left you with tans, memories, bottled peaches and lots of parade candy :). I know that is what mine left for me! Anyway, I am ready to post some fun ideas and tricks that I have been stashing away for Cookie Nut. The first is something that I am sure you have never heard of, spray paint. Well, I am sure you have heard of it, but maybe didn't realize all of the possibilities! Or was that just me? Probably. I am just fascinated and excited about all of the things that I want to transform with spray paint! My little 2-year-old was in desperate need of a "big girl" bed, so I decided to upgrade my older daughter's bed so we could pass hers along. My Mom had an old bed that she was getting rid of, so I snagged it and decided to spruce it up a bit. Here is the before.... 
 
 
 I won't go into all of the steps, but I will direct you to All Things Thrifty. This lady has some amazing things on there, and her tutorials were very easy to follow. Her Painting Furniture 101 tutorial can be found here. I followed her proccess exactly. My result was this......
 
 
I love it! I used Krylon paint in Blue Ocean Breeze. This is the first piece of furniture that I have painted on my own, and I just think it is grand. I can't wait for what is to come! And if you already have this whole spray painting business figured out, please share your expertise with me!

Entry Table Update

5/29/12

Before
After
We moved to Texas a little over a year ago.  While we love the size of this house, it was lacking in storage...namely a coat closet.  So we purchased this entry table from Ikea.  It's perfect because you have 8 compartments.  We bought some baskets for the kids shoes and the upper cubbies we used for the kids to put their schoolwork.  But it was the first thing you saw when you walked into the house.  It needed a facelift.


Project #1
This one was pretty straight forward.  I simply printed of our wedding date.  (Yes, you are seeing it right!  We got married the day after Christmas)  Take a candlestick and a picture frame and glue it together.  Very easy.


Project #2
Again, pretty simple.  I took the other candlestick and added a glass container to the top with some gorilla glue.  I had purchased some wooden balls and I painted them the colors I wanted.  I filled it with the ball and some floral arrangement fillers I got from Michaels.


The End Result
I obviously purchased a new picture of the Salt Lake Temple.  I got it at Deseret Book.  They were no longer making them, so I got it on clearance for 70% off.  It was a steal and it was the perfect colors.  Now, if only I wasn't renting and could paint the wall a different color.

Friday's Feature {Craft Trifecta}

5/18/12


This week, I wanted to feature Delicate Construction - Craft Trifecta.  I have seen string art before and I have seen ombre before, but I love the combination.  I think that this would be adorable as Artwork in a girl's or boy's room.  So cute.

Rules:
  • Any creative idea will do
  • No selling or promoting, so no etsy stores
  • Giveaways are now permissible ONLY if they are a handmade object
  • Grab a button to link back to this blog
  • Start sharing!
  • And don't forget to check out other link party projects.

DIY Custom Framing

5/2/12

We recently participated in a very special wedding ceremony and reception for my daughter's birthmom.  This was such a great day for our family, and we wanted to make sure that we had the perfect gift to give to the newlyweds.  I decided that I wanted to give them a large framed picture of the Draper Temple that they could hang in their home.
After searching the internet for just the right picture I found this one at Inspirational Art Shop.
I loved the antiqued look and the large frame which measures at 47x29.  This particular piece of art sells for $318.00 which unfortunately was out of the budget.  So, I decided to recreate this look all on my own.  Easy enough right!?  Well, it was just that...EASY!!!

First, I had to locate the ideal image. Lucky for me I found the perfect picture at Lil' Luna.
She offers a wide variety of FREE temple images. I simply saved the image I wanted onto my computer and went into Sam's Club photo shop to enlarge, edit, and have it printed.  The total cost for all of that was $6.35.
Then, I headed over to Home Depot to pick up some base board and mdf handy panel hardboard.  The base board is what I used to create the actual frame and the handy panel is what I mounted the picture onto using some Tacky Spray that I already had on hand.
Total cost for those supplies was $18.25.  (FYI-The base board is sold by the foot and the handy panel was $6.42 for a 2x4 sheet.  I had the handy panel cut to the size I needed and will use the extra for future projects.)
Once my picture was glued to the handy panel I then sought the help of my friend Becky from the Crafting Chicks.  She has some amazing cream from Poppy Seed Creations that gives your photos a protective and textured coating that dries clear.  It also eliminates that photos finish/shine.
With the picture now ready to go I simply had to cut my base board.  For this project I needed the edges of the base board to be cut at a 45 degree angle in order to create the shape of the frame.  It's not necessary, but I would recommend that you use a miter saw for this step.  Once the wood was all cut I went ahead and painted each piece (front and back) a flat black.  You could use a nice paint, but I opted for spray paint.  It's quicker and easier to deal with.  The total cost for this process was $0.00.  I had a neighbor cut the word with their miter saw and Becky let me use a can of spray paint that she had on hand even though I was willing to get it on my own.
After my wood was done drying I simply used a staple gun to connect the frame pieces.  Then I mounted the picture onto the back of those pieces with a staple gun as well.  This is definitely a two man process.  You want to make sure all of the edges are nice and tight.  Again Becky offered her services.  (I have such great friends!!)
At this point all I had to was attach a hanger onto the back. I also covered the back side with some butcher paper to give it a nice clean finished look.  And that's my easy way of creating a custom looking frame on a budget.  Not too shabby for less than $30.00.

Touch the Temple

4/14/12

This is my first post, and I am so excited to be here! I hope to share some ideas, and also gain a lot more. Karena featured a few printables of mine earlier, so I figured I would start with a photo edit that I did a while back. I really love to play with pictures and words to make something great for my home.
As a family we traveled down to the LDS Temple in Houston, Texas last year. We wanted out kids to touch a new Temple and to realize that the gospel is spreading throughout the world! They really enjoyed it, and I saw it as a perfect photo opportunity. I wanted there to be more to it, so I added the quote from President Monson. I just used an online photo editing site to make it black and white and add the text. I hope that it helps to carry the spirit of the Temple into my kiddos hearts. We plan on visiting more temples to add to the collection.

Book Art

4/11/12

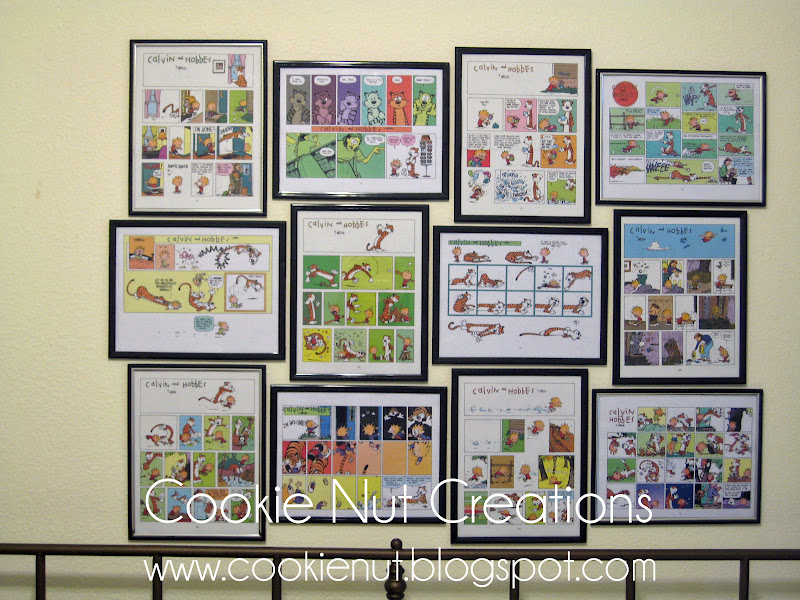
 I have always enjoyed Calvin and Hobbes.  My brother and sister would cut out some of them to turn them into cards, calendars, and things to paste up in our bedroom or bathroom.  So, I few years ago, I bought several of the paperback books.  Years passed and I had barely looked at them.

 One day, as I was spring cleaning, I ran across the books again.  I began reading and reminiscing.  My oldest son came over and started reading them too.  He really enjoyed them.  I decided to do the unthinkable.  I tore some of his and my favorites out of the book and decided to make a this.

 If we weren't renting, this wall would be painted.  So this project doesn't look as good...yet.  For now it's still great.  He loves the pops of color and and the stories.  I love that I bought these frames for $1 and already had the books.  The pictures were 100% free and the project only cost me $12.

The best part about this is that you can use any book you want.  You could use sheet music, a children's favorite book, children's artwork, encyclopedia pages, you could even do the book covers of several different books.  The possibilities aren't endless, but it's pretty darn close.

Friday's Feature {Turquoise Love/Giveaway}

4/6/12


I love that we are now featuring your links on our Friday's Feature.  I love reading all of your posts and seeing all of the fun projects and creations that you are putting together.  However, I don't enjoy picking only one of the links to feature.  This week was no exception.  I finally decided to feature the link
I decided to feature this link because it simply inspired me.  Right now I have secret wish to redo my entire bedroom in just these colors: dark grey and turquoise.  This revamp of her entire living room/dining room was just the inspiration I've been looking for.  I love some of the ideas and interior design that went into this makeover and just had to feature it.
I hope you find it as inspiring and refreshing as I did.  Also, right now on My Champagne taste she's having a great GIVEAWAYClick here for a chance to enter and win some fabulous stuff.

Sorry I got the link party up later.  Between General Conference and Easter...things get busy.

Rules:
  • Any creative idea will do
  • No selling or promoting, so no etsy stores
  • Giveaways are now permissible ONLY if they are a handmade object
  • Grab a button to link back to this blog
  • Start sharing!
  • And don't forget to check out other link party projects.


Faux Metal Wall Art

4/2/12

I saw this idea and just had to share it.  Super easy, super cheap, and super cute.

Believe it or not, this is made from paper towel rolls.  Over at Suzie's Artsy Craftsy Sitcom is this amazing tutorial.  Go check it out.

Friday's Feature {Pink and Green Bedroom} and Link Party

3/30/12

I am featuring from last weeks link party, Totally Lauren Amber.  I picked this submission mostly from this picture.  My favorite things about this room makeover is the picture rail and the pictures and artwork place on it.  I think that it comes together so well...and I LOVE that big letter "M"!

Rules:
  • Any creative idea will do
  • No selling or promoting, so no etsy stores
  • Giveaways are now permissible ONLY if they are a handmade object
  • Grab a button to link back to this blog
  • Start sharing!
  • And don't forget to check out other link party projects.


Envelope Pillow Cover

3/28/12

I was so sick and tired of the pillows in my family room.  Drove me crazy.  So boring and blended into the sofa way too much.  There were 3 options.
  1. I could keep them and get over it
  2. I could buy new pillows
  3. I could make new pillows
I decided the later, but I didn't want to buy three new pillow form because it can add up fast.  So, I decided to make pillow covers.  I fell in love with this orange fabric the I found at JoAnn's Fabric.  Then all I had to do was make them.  It was so easy, very cost effective, and the end result was just what I wanted.  This project only cost me $8 dollars, with most pillows running over $20 a piece...I think this is a much better solution.


Before
After
I used an awesome tutorial that I found and it gave perfect instructions.  You can see the YouTube video here.

The Girl's Quilts

3/14/12

I suppose it's time I come back from my "maternity leave" and start posting some of my projects again.  Although I must admit that the break has been really nice.  It's been a little more difficult to find time to myself with three kids all under the age of three.
These quilts below were a project that was truly a labor of love.  They may look mighty simple, but the flowers in the center gave me a run for my money.  I made these two twin (yes twin size) quilts for each of my girls beds.  Once I new we were expecting another baby I set to work to move our girls into another room and into their own beds.  That, of course, required new bedding and for some unknown reason I decided that I wanted their bedding to be homemade.  Never again :)
 I found the pattern for this quilt in the book
Fresh Impressions by Allison Jane Smith
You can see the pictures and follow the instructions here if you want to make one for yourself. 

The original dimensions for this quilt are 41" X 63", so I had to make my own adjustments to get the full twin size that I wanted. You'll notice that the original pattern has the flower off center, but that really wouldn't work on a bed, so I centered mine. I also wanted these quilts to be something that my girls could grow into and not out of too fast, so I went with more bold and bright colors and steered clear of the pastels.
All in all I'm very happy with how they turned out and how much my girls love them. I guess that's all that matters right!?

Foam Board

2/22/12


Recently, I have been adding artwork around the house. Canvas can be expensive. And Karena did a post, Canvas Alternative, about using MDF as an alternative, but I am going to take it a step further. If you are looking for an inexpensive, quick solution...the answer is foam board.

Form Board isn't as strong as canvas or MDF, but it's lightweight which makes it cheap to hang.  Granted, this solution won't work for every project, but here are a few I did and they turned out great.  I loved making this photo collage for my newlywed brother and his wife.  It turned out so cute and they loved it.  It was a great way to fill a wall space for little money.  This comes in handy when you are newly married and can't afford much, if your on a tight budget, or just like to have more money in your wallet!


These next two I made for my daughters' rooms.  Just like canvas and MDF, the options are limitless on the art you can create.


Related Posts Plugin for WordPress, Blogger...