Showing posts with label Halloween. Show all posts

A Halloween Treat::Devil’s Food Cake Mix Cookies with Butterscotch Chips

10/26/11

I've recently been making my chocolate chip cookies with cake mixes instead of the regular flour, butter, and vanilla that most recipes call for.  I love how fast they are to make (since all I'm doing is opening up a box and adding a few ingredients) and how soft and chewy they seem to stay as the days go by. 
The great thing about using a cake mix is the option you have to use a variety of flavors...and colors for that matter.  For the cookies above I simply used a Devil's Food cake mix and added in some butterscotch chips.  I was going for a festive look.
Here are a few recipes that I've found online and have been using to make these types of cookies.  However, I've played around with them a bit and continue to make adjustments here and there. 

__________________________________

INGREDIENTS:
1 box of cake mix (any flavor or brand)
2/3 cup oil
1 egg
Add any extras you want - nuts, raisins, chocolate chips.

DIRECTIONS:
Mix ingredients well. Form into medium size balls and flatten slightly. Use ungreased cookie sheet. Bake at 350 degrees (until edges are brown), about 8-10 minutes.

VARIATION:
Instead of oil add 8 ounce cream cheese, 1-2 eggs, and 1 stick butter and mix well.
__________________________________

INGREDIENTS:
1 cake mix (any flavor or brand)
2 eggs
3/4 c. oil  (I've cut this amount to 1/2 c.)
1/2 c. brown sugar  (optional....I've only been using 1/4 c.)
dash of salt
1 c. chocolate chips

DIRECTIONS:
Mix ingredients well. Form into medium size balls and flatten slightly. Use ungreased cookie sheet. Bake at 350 degrees (until edges are brown), about 8-10 minutes.

Friday's Feature {Dog Tie} and Link Party

10/21/11

Yes, you read that right. Some times our four legged friends get left behind in the crafting department, so I found this tutorial on making a tie for your four legged bestie.

Really??? Could this be any cuter? {and with Halloween coming up what a perfect time you dress your dog up... or your cat I suppose, but they tend to be a bit more temperamental}

Head on over to Dog Under My Desk for this tutorial, and you can see what other things she has for dogs!

Rules:
  • Any creative idea will do
  • No selling or promoting, so no giveaways or etsy stores
  • Grab a button to link back to this blog
  • Start sharing!
  • And don't forget to check out other link party projects.


This Year's Costumes

10/19/11

I wanted to get an early jump on Halloween costumes this year.  So, around the first part of September I started racking my brain for ideas on what I could have my girls be this year.  Because we live in Utah and our temperatures towards the end of the month can be on the chilly side, costumes need to be flexible to those conditions.  Otherwise they just get covered up with a winter coat.  Which, to be honest, will probably happen anyway.
So, with that in mind I started hitting up the thrift stores in hopes of finding a decent costume.  Lucky for me I found the perfect little cheerleaders outfit for my youngest girl.  And, it was only $3.50.....SCORE!!!  (I found the pom poms at Hobby Lobby for $1.00 and I made the little mega phone which will double has her candy bucket.  See the tutorial below.)
It's a heavy polyester fabric so it's already on the warmer side and I love that the top has longer sleeves and a slight turtle neck.  Plus, it will be easy to layer with a long sleeve shirt and some thick tights.

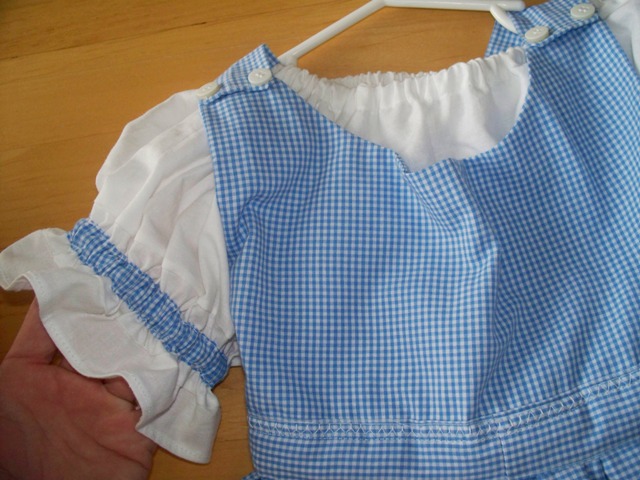
For my oldest daughter I was leaning towards some type of princess outfit.  However, they are ridiculously overpriced and can be a little on the skimpy side.  Not conducive for cold weather.  Since my oldest is obsessed with dresses right now I decided she had to be dressed up in something that used a dress.  So, instead of a princess I went a little more on the traditional side and made her a little Dorothy outfit.
I think all the fabric for this cost me $7.00 and the wicker basket I got at a local thrift store for $1.50.  Not bad for something that was thrown together.  She had the little black dog (it was a gift from her birthmom) and a friend of mine might have some red shoes she can borrow.  If not, I'll be making her a pair.
I actually didn't use a pattern for this costume.  My little girl doesn't hold still long enough to allow me to take measurements, so I used another dress that she has to create this look.  For the shirt I simply followed this tutorial.  I also made it on the larger side so it can worn again next year, if needed.

Like I mentioned above I wanted the girls to have a Halloween bucket that coincided with their costumes.  So, it was only fitting that Dorothy had a wicker basket and that a cheerleader had a little mega phone.  (Karena came up with that one!)  Here is how I threw that together.

Supplies:  Crafting Foam, Glitter Paper, Sequins, Scissors, Mod Podge, Staples, and Hot Glue.
First, I determined what size I wanted the mega phone to be.  I didn't want it to be too big for my little girl to carry, but I wanted it big enough to hold plenty of candy.  Then, I cut out this basic shape.
For the letters, I simply printed them from the computer, cut them out, and then traced them onto the back of the glitter paper.  Make sure that when you trace your letters that they are backwards.
Once the letters were cut out I glued them onto the crafting foam with some Mod Podge.  It takes awhile for the Mod Podge to adhere, so you need to be patient and continue to press all the edges down.
Once the letters were done drying I stapled a "handle" onto the edge of the foam, rolled it up, and used hot glue to stick my edges together.  I also added a single staple to the top...just in case.

I didn't want any candy falling out of the bottom and I wanted a clean look for the "mouthpiece", so, I used a PVC end cap that we had on hand and simply hot glued it to the end of the foam.
For the finishing touches I hot glued on some sequin stars to help give it a little pop and hole punched some holes to attache a ribbon handle tied  for my little girl to use.  Simple and easy, but exactly what I wanted.

Friday's Feature {Fabric Pumpkins} and Link Party

10/14/11

I thought that making these fabric pumpkins from Little Gene Green Bean would be a great way to use up some scrap fabric while adding to my Fall decor.  Plus, I wouldn't mind it if my girls were to play with these pumpkins instead of my more fragile ones.
 Simply click on this Fabric Pumpkin Tutorial to start making a set of your own.  And don't forget to check out the other amazing things that Gene has created!  She has some fantastic printables for all your toddler and preschooler needs and has created some other fun little things.

Rules:
  • Any creative idea will do
  • No selling or promoting, so no giveaways or etsy stores
  • Grab a button to link back to this blog
  • Start sharing!
  • And don't forget to check out other link party projects.


Spooktacular Cupcake Ideas

10/12/11

I'm not much of a cake decorator and probably never will be.  Luckily, I have a neighbor who is amazing when is comes to all things that deal with frosting.  However, there are so many fun ways to create spooky cupcakes for any Halloween party.  Even for the average decorator like yours truly.  Here are just a few that caught my eye.

 Slime Filled Monster Cupcakes
Mummy Pumpkin Chip Cupcakes with Brown Sugar and Butter Cream
Monster Cupcake
Black Widows-Unknown
Spiky Monster Cupcakes
Skeleton Bones
Pumpkin Cupcakes
Jack Skellington
(Nightmare Before Christmas)- Unknown

Baby Costume Ideas

10/10/11

I don't know about the rest of you, but when I have a little one, I sometimes find it hard to come up with costume ideas.  Here's a few that I found that I just had to share!  But I want to see more, leave a comment or email me with the link to a great Halloween costume idea, and I'll add it to the post!


Unknown - Mummy


Keep the ideas coming!


Looking Back

10/5/11

I thought it would be fun to take a look back at some of the things that we threw together for Fall and Halloween last year. 

Fun With Foam (Printables)
and

Friday Feature {Halloween Wreaths} and link party

9/30/11

I love wreaths!! And they are not just for Christmas any more! There are wreaths popping up for every occasion!

Halloween is in only a month away, but you still have plenty of time to make an easy wreath. I know I am only suppose to pick one thing to feature for our Friday feature, but I couldn't decided which one was the best, so luck you.... you get 3!

Easy -easy. Head on over to Something to Do with Jamie on how to make this wreath with only 3 things!
This one I think is by far my favorite and most "Halloween-y". Meg with a love for all things Halloween shows you how to make this at MEGA-SPOOKY!
Here is another easy wreath that can be done in about an hour.... as long as you are quick with catching snakes..... maybe I'm kidding. Amber at The McIllece Spot tells you how she made this one.

Now "witch" one are you going to pick???


Creative Inspirations From Hobby Lobby

9/21/11

If you are the type of individual who needs to see something that's already been made in order to jump start your own creative juices, then I highly recommend that you start collecting some of Hobby Lobby's Creative Inspirations pamphlets.  Not only are they chuck full of fun ideas and projects, but they are also free.  BONUS!! 
These great pamphlets give you several creative options that involve the same main crafting supply.  For example in the picture below you can see some of the different ways that an ordinary clothes pin can be used to create a large variety of projects. 
You can even find some helpful hints and step by step tutorials on how to create some of these unique looks, depending on the project that is being showcased.
For some reason I just barely discovered these little gems.  Probably because I spend most of my time at Hobby Lobby fighting my girls and trying to run in and then right back out.  But, in case you're like me and haven't known about Hobby Lobby's Creative Inspirations simply go to their store and look for them in any of their crafting isles. 

Here are few of the fun things you can expect to find:
  

Related Posts Plugin for WordPress, Blogger...