Showing posts with label Christmas/Winter. Show all posts

Friday's Feature {Overnight Praline Pecan French Toast)

1/20/12


This week's Friday Feature is a warm, gooey, guilty pleasure.  Head over to Valerie's Recipe Box for this amazing recipe!

Rules:
  • Any creative idea will do
  • No selling or promoting, so no giveaways or etsy stores
  • Grab a button to link back to this blog
  • Start sharing!
  • And don't forget to check out other link party projects.


Mock Russian Spiced Tea (Emphasis on the Mock)

1/17/12

This Is NOT Tea!

I love having a warm drink around the holidays, during the winter months, and through the cold and flu seasons.  I'm not much of a wassail person...I never have been, but this is a great alternative.  I was introduced to it by my aunt several years ago (thanks Vicki) and now I make it every year.

One of the great things about this recipe is that it makes a lot and is a great gift idea for neighbors and friends.  Just make the powder, put it in a jar, attach the instructions, and there's your gift.

Again, this isn't a tea.  This is a recipe based off of a popular Russian tea that tastes similar but without all the caffeine.  Here's the recipe.  Enjoy!

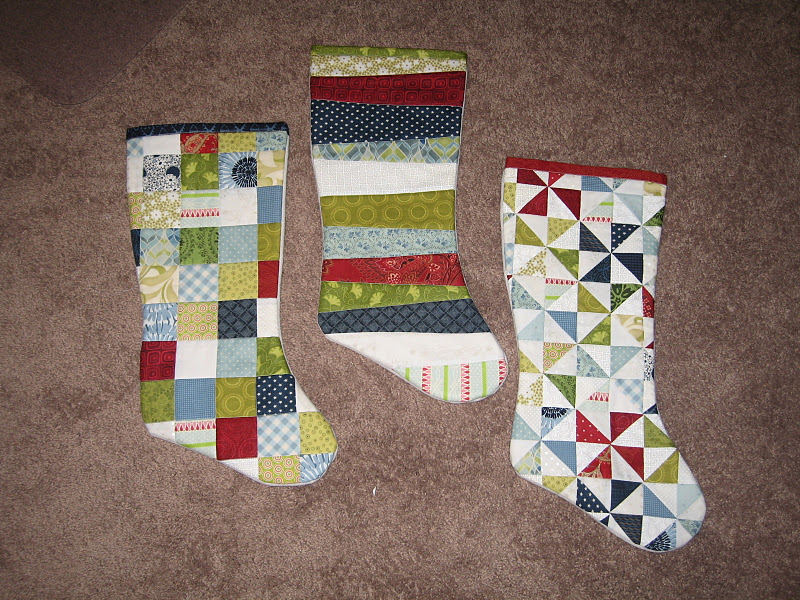
Quilted Stockings

1/9/12

I know that Christmas is over...even if I still have some Christmas decorations up...but I wanted to show you what I started working on before Christmas.


I still have three more to do before Christmas next year...as well as a matching tree skirt.  So far, I'm loving it.  I can't wait to finish them.  And when I'm done, I will be offering the patterns that I came up with so that anyone can do it!

As you can tell, I was planning on doing cuffs, but it's a lot easier and you get to see more of the design and fabrics.  Here's what they will look like when I have them all done.  Super excited!

Wrapping up the Year

1/4/12

Since I have another baby that will be joining the family in a few weeks (fingers crossed) I've been slowly trying  to organize my house.  So, I have storage conatiners and ideas of clean junk free spaces on the brain. And to be honest, baby or no baby, I always find myself wanting to get organized once the holidays are done and a new year is beginning.  I couldn't think of a better place to start organizing than with the leftover wrapping paper, ribbons, and trim that seems to double each year.

Here are some of my favorite ideas that others have come up with.
(This one is my favorite!)

Friday Feature {Candy Tray}

12/23/11

Do you ever wish you had a cute tray or dish to go with your cute little treats? I do... We don't have a lot of storage space right now for a lot of the extra holiday dishes.


I found this over at Tutto Bella and I thought it was a great idea! She even goes on and makes different designs.

It's a Candy Serving Tray

Don't those Hersey Kisses look great on that tray?? I think so, and that tray is MINTS!!!

Head on over to Tutto Bellas and take a peek at how to do this!

Friday's Feature {Zakka Life} and Link Party

12/16/11

Zakka Life is another one of those blogs that I stumbled upon one day.  It was also one of those blogs that was hard for me to pick just one post to feature.  So, here are a few of the many posts that ended up catching my eye.  I really had to limit myself, so please go take a look at some of the great creations and tutorials that Jessica Okui has put together. 


Rules:
  • Any creative idea will do
  • No selling or promoting, so no giveaways or etsy stores
  • Grab a button to link back to this blog
  • Start sharing!
  • And don't forget to check out other link party projects.


Friday's Feature {Yarn Ball & Ornament Wreath Tutorial} and Link Party

12/9/11


This Friday's Feature is from Life Through The Lens, and I fell in love with this beautiful idea.  I wanted to show this closer to Easter (when I first found it), but I knew that no one would be able to find ornaments at that time of year.  So keep that in mind...you can make this for any holiday.  I've seen lots and lots of wreath ideas, but I loved the simplicity and the texture of this one.  Check out her blog to see her super easy tutorial!


Rules:
  • Any creative idea will do
  • No selling or promoting, so no giveaways or etsy stores
  • Grab a button to link back to this blog
  • Start sharing!
  • And don't forget to check out other link party projects.


Advent Calendar

12/7/11

I wasn't able to find the original site for this advent calendar, but I loved this idea and just wanted to share it.
Unfortunately, I don't have nearly enough time to even think about starting this project (even though I have all of the supplies).  But, it is now on my "to do" list for next year. 
I love the idea of having little packages hanging from the clothespins, but I thought it could also be fun to have notes to our kids in little envelopes, or even little secret Santa tasks for everyone to accomplish that day.  The ideas with this advent calendar are limitless and the simplicity of it is right up my alley.

Fast and Easy Ornament Hangers

12/5/11


Well, I don't know about the rest of you, but I think that it is very "Bah Humbug" of Christmas Ball Distributers to sell you the balls without providing the hooks necessary to hang them on your tree.  Not Cool!  I love to look of ribbon, but it's amazing how fast your ribbon goes when you are making a lot of loops for ornaments.

Ball Chain!  I had a bunch left over from a different project.  I got mine from Michaels and it came in a small bag with about 20 chains and clasps.  But I like the idea of having a large spool and make as many as I need (just don't forget the connector clasps).  And it looks a lot better than cheap hooks.

Friday Feature {RACK} and Link Party

12/2/11

We have entered into a great time of year!! The Christmas season!  I love this time of year as I am sure you do too.

Unfortunately, we live in such a busy society that it's a lot of work sometimes to really focus on the Christmas spirit. Between the shopping and domestic stuff and still needing to run kids to their things it gets busy. {please tell me I am not the only one that struggles with this}.

Traci over at tsj Photography found a really cute idea for serving every day.

Everyday in December Traci and her girls do a different random act. {What a cute way to display it all.}
Go see Traci at tsjPhotography to see all the great things that they did to get ideas for your wall of RACK!

Rules:
  • Any creative idea will do
  • No selling or promoting, so no giveaways or etsy stores
  • Grab a button to link back to this blog
  • Start sharing!
  • And don't forget to check out other link party projects.


Kid's Picture Ornaments 2011

11/28/11


Okay, these were super fast, super easy, super cheap, and they're adorable.  Every year I'm making different types of ornaments for each of my kids.  Last year, I made Christmas Block Ornaments with Camie.  This year, I was inspired by the Backpack ID Tags.  I simply bought some 2"x3" rectangular wood pieces from Hobby Lobby (they also have them at Michaels), printed off their photos on my printer, inked the edges, Mod Podged, and clipped on a paper clip.  I did add some scrapbook paper to the back as well, but you don't have to because no one will see it.  You can also add some scrapbook paper to the paperclips like I did on my Mini Clipboards, but (for now) I kind of like the simpleness of the black.  Then I hung them next to their Alpha Ornaments.

Friday's Feature {DIY Fall Frame} and Link Party

11/25/11

I almost made something just like this using our last name, but never started it.  Amanda Joy, from Joy in the Jumble, is the creator of this great fall piece.  Just click on this tutorial to create your own work of  fall art.  I love the that she used a frame for this project.  This would also look great on wooden blocks too.  Love it.  This is now on my list for next year.

Rules:
  • Any creative idea will do
  • No selling or promoting, so no giveaways or etsy stores
  • Grab a button to link back to this blog
  • Start sharing!
  • And don't forget to check out other link party projects.


Christmas Block Ornaments

11/23/11

I made these block ornaments last year as birthday gifts for my mom and mom-in-law.  I wanted each of them to have some ornaments of representing their grandkids and after seeing this tutorial I knew these blocks would be a big hit...and they were!
I did change things up a bit with the ones that I made.  Instead of using a cup hook I decided to use an eyelet hook.  I didn't want the ribbon falling off each time they were packed away into storage.  I also wanted to differentiate between boys and girls ornaments, so I made sure to print all of the girls names onto a red paper while the boys were on a green one.  Then I made sure the ribbon color cordinated with their name colors.  In other words, the boys blocks were green with green ribbons while the girls were red with red ribbons.
I fell instantly fell in love with them and decided that I wanted to have a set for my own tree, but I didn't want to just stop there.  I decided that I wanted to have a block representing each year.  One for each of our kids and one of the family.  So, I went back into our photo archives and dug up some past pictures representing a family photo for each year we've been married.  Then, I made one for each of my girls.  I know that may seem like a ton of blocks hanging on one little tree, especially as the years go by, but the goal is to give my girls their set of blocks to hang on their own trees some day and keep them family blocks for myself. 
I finshed all of them, but I have not taken the pictures yet, so here is the file of my pictures to give you an idea of what you can do with these fun ornaments.


HOPE YOU ALL HAVE A GREAT THANKSGIVING!!!!

Alpha Ornaments

11/21/11

Is it too early for Christmas Ornaments?  Not in my perfect world.  If it were up to me, I'd put up my tree after Halloween.  I think that having my tree up during Thanksgiving is so warm and homey.  Plus, this gives everyone a chance to work on them.

Last year I was inspired by Camie's Personalized Glitter Ornaments, but I didn't want to deal with all the glitter, so I decided to use scrapbook paper instead.  And instead of using wood letters, I found  Chip Board Letters at Hobby Lobby for $1.  I liked the font type a lot better, and they turned out great.


First I did only the kids, but I loved them so much that I had to do one for my husband and I.

Here's how I did it:

Get Chip Board Letters, Scrapbook Paper, Mod Podge, Sponge Brush, Scissors, Sand Paper, Ribbon, and a Butter Knife.

Use the Butter Knife to separate the third layer of Chip Board away from the the other two.  This makes it so that you can later put the ribbon in between the layers.  That will help it to hang straighter.

Brush on the Mod Podge onto the front of the letter.  Place it onto the back of the paper.  Make sure to turn it over and smooth out any bubbles.

Cut away as much excess paper as possible.

Sand away the remaining paper.

Mod Podge the ribbon and the back piece from the Chip Board.  Squeeze them together and wipe away any excess Mod Podge from the edges.

Hang it up when it's dry.  So simple and super cute!
Related Posts Plugin for WordPress, Blogger...